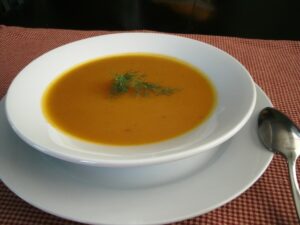
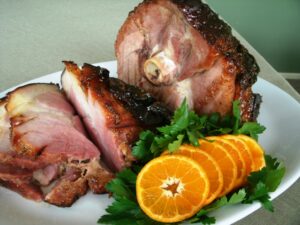
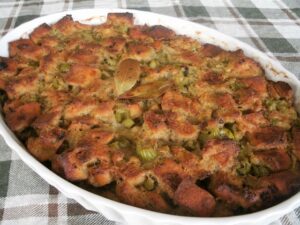
Just Beet It: Balsamic Roasted Beets with Gorgonzola and Walnuts

Just Beet It: Balsamic Roasted Beets with Gorgonzola and Walnuts

I did not grow up eating beets. My parents were not adventurous eaters, and beets just looked too odd, what with that startling crimson color and all. I was probably in my 30’s before I had ever voluntarily tasted beet roots, and I was hooked from the beginning.

I was watching TV the other day and came across an episode of Gourmet’s Diary of a Foodie. I’ve seen it a few times, but it can be a little esoteric for my tastes. I’m not knocking it. It just isn’t my cup of tea, so to speak. But this one featured a dish that had my mouth watering: Pasta with Beet Greens. There was really nothing to it, just some pasta with onions, cured olives, some pine nuts, and beet greens. It had my mouth watering so much that I had to pick up a bunch of fresh beets with the tops when I was at the store so I could make it. But it left me with a dilemma: what do I do with the beet roots?

Part of what attracts me to beets is their ability to taste both earthy and so sweet at the same time. It really is a unique flavor, isn’t it? I usually roast them simply, with a little olive oil, salt, and pepper. No fuss, no muss. Of course, now that I have to come up with something interesting to write about on a regular basis, I can’t really rely on simple now, can I?

The problem is that you don’t want to do too much with beets. Like I said, part of their appeal is their singular flavor. If you add too much, the flavors begin to compete, and then you’re left with a mess.

I started by adding some balsamic vinegar to the olive oil and let the beets marinate for a few minutes. Then I tossed in just a sprinkling of thyme to highlight the woodsy flavor. A little salt and pepper, and there you go. Still simple but right, you know? For presentation sake, I also sliced the beets before I marinated them. Laying them out on a baking sheet that way also cut the cooking time from 50 or 60 minutes for whole beets to about 25 minutes for the sliced version. Then I hit it with the secret weapon: sweet, creamy, and tangy gorgonzola cheese.

I don’t think there’s a better flavor combination than blue cheese and something sweet. Dates, figs, ice cream, you name it. So why not add a little gorgonzola to contrast the sweetness of the beets? (My mouth waters just thinking about it.) So I had earthy, sweet, tart, and tangy. All I lacked was a little crunch. Another natural pairing with blue cheese (I think) is nuts. So I toasted a handful of walnuts and sprinkled over the top.

Let me tell you, the key to this dish is getting it all in one bite: beet, cheese, and nut. It’s to die for. This side dish is so great, that I think you should serve it with a main course that has very simple flavors, like a simple sautéed chicken breast (which is what I did). Just salt and pepper in a sauté pan. Let the beets be the star of the dinner. You know, just beet it.

Balsamic Roasted Beets with Gorgonzola and Walnuts

Scott Duncan, ©2010
An underrated vegetable gets its due in a flavorful and easy way
Prep Time 15 mins
Cook Time 25 mins
Total Time 40 mins
Course Side Dish
Servings 4

Ingredients
  

  • 3 large or 4 medium beets, cut into ½” slices
  • 2 T olive oil
  • 2 T balsamic vinegar
  • ½ t dried thyme
  • Salt & pepper to taste
  • ¼ C chopped walnuts
  • ¼ C crumbled gorgonzola cheese

Instructions
 

  • Preheat oven to 400 degrees F.
  • Line a baking sheet with heavy duty aluminum foil.
  • In a mixing bowl, combine olive oil, balsamic vinegar, thyme, salt and pepper.
  • Stir to combine.
  • Add beet slices and toss to coat.
  • Let sit for 10-15 minutes, tossing to recoat once or twice.
  • Lay beet slices out on baking sheet in a single layer.
  • Roast for 25 minutes or until fork tender.
  • While beets are roasting, place walnuts in a dry sauté pan over medium heat.
  • Toss occasionally until you just smell the aroma of walnuts.
  • Remove immediately from heat and reserve until later.
  • Once beets are tender, transfer to serving dish and top with crumbled gorgonzola and walnuts.

This post was reblogged from my earlier site, Inexpensive Eating.

Fall in Florida: Pumpkin Pie Chocolate Chunk Ice Cream

Fall in Florida: Pumpkin Pie Chocolate Chunk Ice Cream

I’ve always been one to choose seasonal ingredients when I cook. For one, seasonal ingredients are usually cheaper – but most importantly, seasonal ingredients are picked at the peak of their freshness so they taste great.

The one season I wait on all year is fall. There is something about squash, sweet potatoes, hearty greens, apples, and beets that I crave. But most of these ingredients lend themselves to warm and hearty fare. While that’s fine in most parts of the US, here in Florida it is difficult to wrap your brains around thick, steaming dishes when the forecast for Halloween is 87 degrees. See my dilemma?

That’s why this dessert is perfect for Florida. I have been playing around with this recipe for quite some time, and I think I’ve finally nailed it. It screams fall, is totally decadent, and cools you down on those chilly fall evenings where the temperature bottoms out at 70. It follows the basic principles of a good pumpkin pie, which is why it tastes amazing. And nothing has really ever been harmed by adding chocolate, now has it?

For some reason people look at ice cream making as a big, involved process. It’s not, especially with the new ice cream freezers on the market. It only takes 20 minutes or so to make the base; then you chill it down (in an ice bath, that can be as short as an hour); and then toss it into the ice cream freezer for 20-30 minutes. It really couldn’t be simpler – and the return on investment is tremendous. Besides, I can put this quart of Pumpkin Pie Chocolate Chunk Ice Cream together for less than three bucks. How much is a quart of gourmet gelato at the store? (Last time I looked, over $6.)

But be careful – we got in the habit of making ice cream several years ago, and we can no longer buy most of the selections that come from the grocery store. I don’t know if you’d call us ice cream snobs, but now the mass produced stuff just tastes like chemicals and preservatives. If you make enough ice cream yourself, it will happen to you too – consider yourself warned.

The one piece of advice I will give you about this recipe – my ice cream maker absolutely did not like it when I tried using chocolate chips. The pieces were much too large for the ice cream dasher. Get a bar of chocolate and chop it into fairly small pieces. It will work much better for you. Also, I use a good quality dark chocolate. I think it pairs better with the pumpkin than milk chocolate did (of course, I’m not a big fan of milk chocolate either, so that may have something to do with it).

So enjoy a taste of the fall season without breaking into a sweat. And if you find a way to bag this up and give out for trick-or-treaters, let me know. I still haven’t figured that one out yet.

Pumpkin Pie Chocolate Chunk Ice Cream

Scott Duncan, ©2013
Beat the Florida heat and still enjoy the great tastes of Autumn
5 from 1 vote
Prep Time 4 hrs
Cook Time 40 mins
Total Time 4 hrs 40 mins
Course Dessert

Ingredients
  

  • 2 C half & half
  • 1/2 C sugar
  • 1/2 vanilla bean split and seeds scraped
  • pinch of salt
  • 3 cloves or a pinch of ground cloves
  • 3 allspice berries crushed (or a pinch of ground allspice)
  • 3 large egg yolks
  • 1/2 c canned pumpkin
  • 1/2 t ground cinnamon
  • 1/8 t ground nutmeg
  • 1/8 t ground ginger
  • 1/4 C finely chopped dark chocolate

Instructions
 

  • In a large saucepan over medium heat, add half & half, sugar, vanilla seeds, vanilla pod, salt, cloves, and allspice.
  • Heat until wisps of steam rise and very small bubbles begin to form at the edge (do not let it simmer).
  • In the meantime, add egg yolks, pumpkin, cinnamon, ginger, and nutmeg to a heat-safe mixing bowl. Whisk to combine.
  • When half & half mixture comes to temperature, very slowly whisk into egg mixture. Be careful not to add too much at once or it will curdle the eggs. (when in doubt, add a ladle at a time and whisk continuously until incorporated).
  • Return mixture to saucepan and place over medium heat, stirring constantly until mixture coats the back of a wooden spoon (about 170 degrees on an instant read thermometer).
  • Strain mixture through a sieve into mixing bowl.
  • Bring to room temperature, cover in plastic wrap, then chill in refrigerator 4-6 hours (or overnight)
  • Freeze according to the manufacturer's directions for your ice cream maker.
  • During the last 2 or 3 minutes of churning, add chopped chocolate and continue until mixed thoroughly.
  • If you desire a firm texture, place ice cream into the freezer for 3 or 4 hours.


5 Ways to Turn Your Master Bath into a Private Spa

5 Ways to Turn Your Master Bath into a Private Spa


Everyone dreams of time away at a relaxing retreat. What if you could travel there just by walking through your bathroom door? That was the vision of recent Mill Creek clients as we transformed their utilitarian Master Bath into a sensational spa where the exclusive membership consists of just two – the homeowner

Turn Your Master Bath Into A Personal Spa1. A Relaxing Tub

Being able to soak one’s cares away was high on the priority list for this project. The troubles of the day wash right off when you are able to unwind surrounded by warm bubbles. Add a book and a glass of wine, and you may never want to leave.

Tranquil Tones2. Tranquil Tones

A peaceful, natural green for the walls was the starting point in this palette. These health-conscious clients sourced a zero-VOC paint from YOLO Colorhouse (the color is called ‘Water.06’). Desiring a crisp simplicity, white plumbing fixtures and white tinted varnish vanities from StarMark Cabinetry contrasted nicely and allowed the green hue of the walls to pop. Tying them all together is a quartz countertop called ‘Praa Sands’ from Cambria, and a 1″ glass mosaic tile that blends all of the colors perfectly.  Of course, it’s not problem  if green isn’t your thing. Stick with cool, restful colors instead of warm, passionate tones to work wonders on your stress level.

 Elbow Room            Elbow Room in the Shower
3. Elbow Room

Never underestimate the power of negative space. Originally, the big, step-up garden tub took so much visual space that it made the room feel cramped. Opting for a free-standing soaking tub (we used the Sax from Maax), and  more importantly, turning it perpendicular to the windows created floor space that allowed for both a bench seat and a decorative console table with room to spare. One potential pitfall in this project was the shower – the clients wanted the privacy of a solid wall instead of a glass enclosure. The solution? Create a shower that is larger than normal and build the walls only 2/3 high. The result was plenty of elbow room and all the privacy the client desired. It’s hard to believe that we ended with more walls than we started, but the area still feels roomier.

Pamper Yourself with Plenty of Storage Space 4. Pamper Yourself

Not only do you need room for the necessities of life, you have to have space for the items you enjoy. Pampering is the entire point of a private spa, is it not? By using the Stratford doorstyle from StarMark Cabinetry for his and hers vanities, we were able to add all of the storage space necessary for some serious pampering, and at the same time create an inviting area that isn’t heavy or overpowering.

 Window as Focal Point5. Proper Lighting

This one is so often overlooked. Not only do you need light that lets you illuminate required tasks, but ambient lighting is a necessary component to create the proper relaxation mood. By taking advantage of the superb window in this space, we not only brought volumes of natural light in, but we had a natural focal point for the room. Can lights in the ceiling functioning on dimmers can create vibes at the touch of a finger. And recessed lighting over each vanity adds necessary task lighting, but by switching them separately, creates great ambient lighting after dark.


Cabinetry: StarMark Cabinetry
Doorstyle: Stratford with optional ‘L’ edge
Wood Specie: Maple
Finish: White Tinted Varnish
Countertops: Cambria Praa Sands
Remodeling Partners: Fred H. Bey, Inc.


And Now, the ‘Before’ Shots

Before #1 Before #2  Before #3


All Choked Up: Chicken with Tomatoes and Artichokes

All Choked Up: Chicken with Tomatoes and Artichokes

I was supposed to be taking the night off. Don was at work, and I had the house to myself for the evening (which certainly is not a common occurrence). I had considered diving head first into a bag of chips for dinner, but then I got the dreaded phone call: Don needed me to bring him something to eat because he wasn’t going to get the chance to get away for a break.

So much for a Doritos dinner. I hadn’t planned anything, so it was going to be a scrounged up meal. And I wasn’t in to making a big, fancy affair either – it was going to have to be quick and simple. I’d bought chicken breasts the day before and had thrown them in the fridge (just too lazy to prep them and store them in the freezer like I should have – lucky me). I had some grape tomatoes that didn’t have any plans and I always have lemons, garlic, onions, and shallots. Then there’s always the trusty canned goods that are in the back of the pantry and seldom used.

I don’t know why I always keep them, but they’re there: canned pumpkin, black olives, a few different types of beans, and the artichokes. None of which I use regularly (or even crave all that often), but once in a while something comes in handy. This was one of those times. Since pumpkins didn’t work with chicken and tomatoes (and I just was not feeling the olives that night), artichokes seemed like the only viable option.

So I set about throwing things into the sauté pan. To round out the flavor, I threw in a little rosemary. And darned if it didn’t turn out tasting pretty good, too. I mean, lemon and garlic are naturals for artichokes (and chicken – and tomatoes too for that matter). Then I tossed in a little fresh parsley, just to brighten it all up after the trip through the pan. Then I threw it all on some firm polenta just to round out the plate. Even though I hadn’t planned on it, I ended up taking pictures and writing down the recipe before it fell out of my head (which doesn’t take too long anymore).

And wouldn’t you know it: just about the time I was packing it up to run it to Don, he called. Turns out that he wasn’t going to have time to eat after all, and he was calling to tell me that I didn’t need to make anything for him. Ugh.

Well, at least it wasn’t a total loss – I got a recipe I wasn’t planning on, even if it cost me a night off. But I’ll tell you what, next time Don calls at the last minute asking me to bring him dinner, he’s getting a bag of Doritos – or the canned pumpkin.

Chicken with Tomatoes and Artichokes

Scott Duncan, ©2010
A quick, weeknight meal that tastes great
Prep Time 10 mins
Cook Time 20 mins
Total Time 30 mins
Course Entree
Servings 4

Ingredients
  

  • 1 T olive oil
  • 1 T butter
  • 2 boneless chicken breast halves
  • 1 small shallot minced (about 2T)
  • Pinch of red pepper flakes
  • 1 clove garlic chopped
  • 1 t dried rosemary
  • 1 lemon zested and juiced
  • 1 14 oz. can of artichoke hearts in water drained and quartered
  • 1 pint grape tomatoes halved
  • 2 T chopped fresh parsley
  • Salt & pepper to taste

Instructions
 

  • Slice each chicken breast like you were going to butterfly it, cutting it in two, creating a total of four chicken breast pieces.
  • Season with salt and pepper.
  • Preheat a large sauté pan over medium high heat.
  • Add butter and olive oil.
  • Sauté chicken breasts until browned, 2-3 minutes per side.
  • Remove from pan, cover and reserve.
  • Reduce heat to medium, and in the same pan add shallot, red pepper flakes, garlic, rosemary, and lemon zest.
  • Cook until shallot is translucent, but not browned, 2-3 minutes.
  • Add grape tomatoes and salt & pepper to taste.
  • Sauté until tomatoes start to give off their juices, 5-7 minutes.
  • Add artichoke hearts and heat through, 2-3 minutes.
  • Stir in lemon juice and chopped parsley.
  • Adjust seasonings and remove from heat.
  • Place about ¼ of the tomato artichoke mixture on top of each chicken breast piece.
  • Serve on firm polenta, mashed potatoes, or your favorite starch dish.

This post is reblogged from my earlier site, Inexpensive Eating.

Crepe Crusader: Sweet Corn Crepes with Scallion Dill Sauce

Crepe Crusader: Sweet Corn Crepes with Scallion Dill Sauce

We found ourselves with an unusual set of circumstances – a rare Saturday night with no work and no plans with friends. What better opportunity for a date night? Unfortunately, it was the first of the month – the mortgage was paid, and not much was left over for dinner and a movie.

So date night at home it was. I didn’t want to do just a regular every night meal. I wanted to make something a little special, but I wasn’t sure what. What eventually came to my rescue? Crepes. What was my inspiration? IHOP, of course. I mean, when you think of a special meal with a gourmet twist, my thoughts automatically go to IHOP, don’t yours? (OK, I saw an IHOP commercial with crepes in it – what do you want? Every great idea can’t come with a flattering story to tell, can it?)

I had plenty of choices to fill the crepes, but I settled on fresh, sweet corn. It’s corn season, and it seems like I’ve been buying it by the silo. But it’s so good this year. And cheap – I think an entire bushel costs about 3 ½ cents (give or take).

I’ve been giving most of my corn dishes an Italian bent lately (garlic and basil go so wonderfully with the sweetness of corn), so I wanted to do something decidedly non-Italian for this rare event.

Other than basil, my favorite flavor pairing for corn is dill. I don’t know what it is, but dill brings out the best qualities of corn, and the corn rounds out the punch when you bite into dill. Once I know I’m using dill, my brain automatically jumps to sour cream. Voila! The basis for my sauce took shape.

By the time I was finished, I realized how ironic the dish turned out to be: French crepes filled with American corn, and topped with a Scandinavian (or is it east European?) based sauce. Where else could this idea come from but the International House of Pancakes?

The reason crepes are special is because I rarely make them. In my head they seem laborious. But every time I make them, I realize that I’m wrong. They’re simple. And it takes no more time to cook 12 of these one at a time, than it takes to cook 12 pancakes 4 at a time. They can also be done ahead. So I threw together the crepe batter and finished them off before lunch. All I had to do was pop them in the fridge until I was ready for them. (I guess you could buy some pre-made crepes from the store instead – but I’m assuming they are designed for dessert and have some sugar added. Not my thing for a savory dish, but that’s your call to make.)

The rest of this dish came together in just a few minutes. The corn filling is a snap, filling the crepes is a cinch, and then you bake them off for 20 minutes. Speaking of which, I love baking filled crepes uncovered – it gives the tops and ends a little crunch. If you don’t like the crunch, then throw some foil over the baking dish before popping it in the oven. The crepes will stay soft and pliable.

Since I spent a little time on the crepes, I didn’t want to expend too much energy for the sauce. This one is a no brainer: basically sauté a few scallions, dump in some sour cream with a couple of other flavors, and heat it through. The sauce is piquant and is a phenomenal contrast to the sweetness of the corn-filled crepes.

I have to say that for no more effort than it took, the crepes saved the day and turned an at-home date night dinner into something special. But in the end, it didn’t matter: Don got called into work, and date night turned into 45 minutes on his dinner break. Look on the bright side: at least we didn’t waste our reservations at IHOP.

Sweet Corn Crepes with Scallion Dill Sauce

Scott Duncan, ©2010
Save the day with this impressive and inexpensive dish
Course Entree
Servings 4

Ingredients
  

Crepes

  • 1 C all purpose flour
  • 4 eggs room temperature
  • 1 C milk room temperature
  • Pinch of salt
  • ½ C butter melted, and slightly cooled and divided

Filling

  • 4 ears worth of corn kernels
  • or 2 C of frozen corn, thawed and patted dry
  • 1 C ricotta cheese
  • ½ t hot sauce
  • ¼ C chopped fresh parsley
  • Salt & pepper to taste
  • 1 egg slightly beaten

Sauce

  • 1 T butter
  • 4 scallions finely chopped
  • 1 C sour cream
  • 1 t Dijon mustard
  • 2 T milk
  • 1 T dried dill
  • Salt & pepper to taste

Instructions
 

To make crepes

  • Place flour, eggs, milk, salt, and ¼ C melted butter into a mixer.
  • Mix until well combined, 15-20 seconds.
  • Set aside on counter to rest for about an hour (you want to allow all the bubbles to subside and the flour to absorb the moisture).
  • Preheat an 8” nonstick pan over medium low heat.
  • Using the remainder of the melted butter, lightly brush the nonstick pan.
  • Pour a scant ¼ C of batter into the center of the pan and swirl until the bottom is coated and the batter no longer runs.
  • Cook for 2-3 minutes on the first side or until the edges dry out and the bottom is slightly brown.
  • Flip and cook for 1-2 minutes more.
  • Remove from pan and start the next crepe.
  • This should yield about 12 crepes. (The cooked crepes can be wrapped up and placed in the fridge for 1-2 days, or placed into a freezer bag and frozen for several weeks.)

To make filling and assemble

  • Preheat oven to 400 degrees F.
  • Spray a 13”x9” baking pan with nonstick cooking spray.
  • Reserve about 1 T of corn and 1 T f chopped parsley for garnish.
  • Place the remainder of corn kernels, ricotta cheese, hot sauce, and remainder of chopped parsley into a medium mixing bowl.
  • Stir to combine.
  • Salt and pepper to taste.
  • Stir in beaten egg.
  • To fill crepes, lay out crepe (better looking side down) and place about 2 T of filling down the center of the crepe. Fold over and roll into a tight log.
  • Place crepe seam-side-down into the baking dish.
  • Repeat until all crepes are finished.
  • Bake for 20 minutes, until crepes are heated through and the filling sets.

To make sauce

  • While crepes are baking, add 1 T butter and scallions to a preheated medium sauté pan over medium heat.
  • Sauté for 2-3 minutes, until scallions are tender.
  • Add sour cream, Dijon mustard, dried dill, milk.
  • Stir to combine.
  • Salt & pepper to taste.
  • Reduce heat to low and stir occasionally for 10 minutes.
  • If the sauce becomes too thick, add a little more milk (or water).
  • To serve, pour sauce over crepes and garnish with reserved corn kernels and parsley.

Notes

This recipe has a few steps, but they are all very simple. The crepes can be made way ahead, and then the whole thing can be assembled about 30 minutes before you want to eat.

This post is reblogged from my earlier site, Inexpensive Eating

All They’re Cracked Up To Be: Black Sesame Crackers

All They’re Cracked Up To Be: Black Sesame Crackers

I’ve discovered there are two things that people are always impressed to find out that you made from scratch: the first is marshmallows, and the other is crackers. “Oh, my God! I can’t believe you made those! I wouldn’t even know how to start.” I’ve heard it several times, and it always surprises me.

I’ve made marshmallows, and they’re a pain. OK, I guess that even I am impressed when someone tells me they made marshmallows (they aren’t overly difficult, just really messy). But crackers? They’re so easy, and these are no exception.

We were invited to a Fourth of July barbeque, and I was asked to bring a side to go along with the main course, as well as an appetizer. Well, you can’t have a Fourth of July cookout without potato salad, so that was a no-brainer. But I was stumped about the appetizer, until I remembered The Bottle.

The Bottle is a 20 oz. canister of black sesame seeds. Don, my Significant Other, had a consulting gig for a big food supplier a little while back. Somehow he ended up bringing home this enormous container of black sesame seeds. I don’t really know how or why, but he walked in the front door and said something like “Here, I brought you a present!”

It’s just what I’ve always wanted. (Can you hear the sarcasm in my voice? I mean, who wouldn’t want enough seeds to fill a stadium?) So I’ve been hard-pressed to use these things before they go bad – I’ve cooked with them, I’ve filled centerpieces with them, handed them out to children as Halloween treats. You name it, I’ve done it. They’re tasty – but there’s too much.

So that’s how the crackers came to contain black sesame seeds. Now, if you don’t have a spouse who cares about you enough to bring you a half-kilo of the black ones, you can certainly use white sesame seeds without any trouble. Actually, I like the visual contrast that the black seeds bring to the table. And the flavor of either is neutral enough that you can pair them with almost any dip or spread that you’d like.

I have to tell you, there are two things I absolutely detest when cooking: peeling hardboiled eggs (which is why you’ll never see a deviled egg recipe from me), and rolling out dough. I can never get the dough even. It ends up sticking. If I use parchment or cling wrap, I end up ripping the paper. It drives me crazy. I hate it. So here’s a tip for you: drag out the pasta roller.

I use the pasta roller attachment on my stand mixer for this instead of mutilating the dough with a rolling pin, and it eliminates my stress level. The only trick is to make sure you have ample flour on the dough before passing it through the rollers. I knead it 3 or 4 times on the first setting, just like I would for pasta. I then run it through until I’m on setting #3. You can make them thinner, but that thickness worked for me.

So the next time you’re feeling a little down on yourself, whip up some of these crackers for someone – they’ll be impressed all to heck, it will stroke your ego, and it’s a lot simpler than those sticky marshmallows.

Black Sesame Crackers

Scott Duncan, ©2010
Impress everyone by making your own crackers - no one will know how simple it is!
Prep Time 15 mins
Cook Time 8 mins
Total Time 23 mins
Course Snack

Ingredients
  

  • ½ C whole wheat flour
  • 1 ½ C all purpose flour
  • ¼ C black sesame seeds
  • 1 t salt
  • ½ t ground black pepper
  • ¾ C water more or less
  • 2 T vegetable oil
  • 1 t sea salt divided

Instructions
 

  • Preheat oven to 400 degrees F.
  • In a large mixing bowl, combine all purpose flour, whole wheat flour, sesame seeds, salt, and pepper.
  • Add oil and about 10 T water to start (3/4 C, less 2 T) mix until combined. Add a little more water if necessary.
  • Turn dough out onto floured board and knead for 60-90 seconds. The dough should not be sticky.
  • Divide dough into 4 equal parts.
  • Working with one piece at a time, roll dough out until very thin.
  • Dock the dough all over with a fork.
  • Sprinkle with ¼ t of sea salt and press lightly into dough.
  • Cut dough into rectangles approximately 2” x 3”.
  • Transfer to a baking sheet and bake for 6-8 minutes, making sure the crackers don’t get too dark.
  • Transfer to a cooling rack.

Notes

You can certainly use traditional light sesame seeds. I just think the black ones add some visual interest to the crackers.

This post is reblogged from my earlier site, Inexpensive Eating.

Rolling the Dice: Mushroom and Spinach Stuffed Pork Loin

Rolling the Dice: Mushroom and Spinach Stuffed Pork Loin

Some good friends are getting ready to head north for the summer (that’s the problem with living in Florida: no one else lives here year-round), so we decided to get together for one last dinner party before they head to the Arctic Circle (OK, they’re summering in New Hampshire, but that’s close enough for me). Even though we were not hosting the evening, somehow I ended up preparing dinner – again.

I didn’t want to do BBQ and burgers, and I also didn’t want to do a formal, sit-down affair. Comfortable but nice is what I was going for. I’ve done too much chicken, seafood, and pasta recently, so I was grasping for something different to make. That’s when I decided to play The Game.

The Game is stupid and is only played in my head. I usually only play it on Friday and Saturday, because the conditions aren’t right the rest of the week. It’s kind of like my own private version of Iron Chef. The goal is to make dinner for company using only what’s in the house. A trip to the grocery store disqualifies you, and you lose. (OK, I’m the only one keeping score and the only one playing – why are the rules so stringent?)

Combing through the fridge, freezer, and pantry I came up with pork loin, purple cabbage, chocolate, spinach, rice, an orange, and mushrooms. So I flagged the chocolate and orange for a dessert. I knew the cabbage, spinach, and mushrooms would work with the pork, but I wasn’t sure how to put it together. So I started playing with ideas in my head.

I thought about roasted pork with some sort of glaze, but that sounded boring. Spinach and rice sounded blah. Then I happened to remember the Beef Wellington I made last Christmas. There was a duxelles spread on the puff pastry before it was wrapped up. So I zeroed in on Pork Wellington, but I didn’t have any puff pastry, and going to the grocery store meant I’d have to accept defeat. So I started playing with the idea of stuffing the pork loin with a knock off of a duxelles with mushrooms and spinach. Instead of pulling out a recipe, I just decided to wing it and came up with this stuffing.

I also remembered Dijon going into the Wellington, so I brushed the pork loin with mustard before adding the mushroom mixture (and who doesn’t like mustard with pork anyway?).

Sautéing the cabbage became a no-brainer after that. Besides, the plate was going to need some color. I think purple cabbage tastes so much better than green cabbage. It’s sweeter, especially when it’s sautéed with some onions. Green cabbage always tastes a little bitter to me. I rounded out the meal with an herbed rice.

All of this gave the dinner a little more class than a BBQ, but it wasn’t anywhere near stiff and stuffy either. The roulade looked pretty on the plate, and I scored with the entrée. Dessert, on the other hand, needed some work. (I’ll spring that on you when I perfect it – it’s still a good idea, just wasn’t executed well.)

All in all, I think the score in my head was an 8.7 (that East German judge always brings down the average). Oh well, it’s just a game. Right?

Mushroom and Spinach Stuffed Pork Loin

Scott Duncan, ©2010
Any way you roll it, this is a great meal
Prep Time 30 mins
Cook Time 40 mins
Total Time 1 hr 10 mins
Course Entree
Servings 4

Ingredients
  

  • 1 ¼ - 1 ½ lb boneless pork loin
  • 4 oz. mushrooms chopped
  • 1 small shallot chopped (about 2 T)
  • 1 garlic clove crushed
  • 1 t dried thyme
  • 4 oz frozen spinach thawed and drained
  • 1/8 t ground nutmeg
  • 5 T olive oil divided
  • 2 T Dijon mustard
  • Salt & pepper to taste
  • 4 pcs butcher’s twine approx. 18” each

Pan Sauce

  • Drippings from pork loin
  • 3 T flour
  • 1 shallot minced
  • 1 C white wine
  • 2 C chicken stock
  • Salt & pepper to taste
  • 1 T butter chilled

Instructions
 

To butterfly pork loin

  • Lay pork loin flat with cut end facing you.
  • Using a sharp knife, slice pork loin horizontally from the left or right side. Cut approximately ¾ of the way through, being careful not to cut the loin into two pieces.
  • Open pork loin and place cut side up.
  • Then butterfly each ‘wing’ of the pork loin, beginning in the middle and cutting ¾ of the way through each side.
  • Open each side so you have a total of four ‘wings’ spread across as a single piece of meat.
  • Set aside while you prepare the stuffing.

To make stuffing

  • Preheat large, oven-safe sauté pan over medium high heat.
  • Place mushrooms, shallot, garlic, thyme, 2 T olive oil, salt & pepper (to taste) into the bowl of a food processor.
  • Pulse until finely chopped, but not pureed.
  • Transfer to preheated pan and sauté with an additional tablespoon of olive oil until most of the moisture has evaporated, about 5-7 minutes.
  • Once most of the moisture has evaporated, add spinach and nutmeg to sauté pan and heat through (2-3 minutes).
  • Set stuffing aside to cool.

To assemble pork loin

  • Preheat oven to 400 degrees.
  • Preheat same sauté pan over high heat. Salt & pepper inside of pork loin.
  • Spread Dijon mustard evenly over cut side of pork loin.
  • Add stuffing mixture and spread evenly over inside of pork loin.
  • Beginning with outside end, roll pork loin up.
  • Secure with butcher’s twine.
  • Sprinkle exterior of roll with salt & pepper.
  • Add olive oil to preheated sauté pan and sear all sides of pork loin in pan, 2-3 minutes per side.
  • Once all sides of pork loin are seared, transfer sauté pan with pork to preheated oven.
  • Roast until internal temperature reaches 145 degrees (20-30 minutes).
  • Remove pan from oven, and remove pork loin from pan.
  • Tent pork loin with foil and let rest for 10-15 minutes.
  • While pork is resting, use sauté pan and pork drippings to create pan sauce

Pan Sauce

  • Place sauté pan with drippings over medium heat.
  • When drippings are heated, add shallots and sauté for 2-3 minutes, until translucent.
  • Whisk in flour and let cook through for 1-2 minutes.
  • Whisk in white wine, deglazing the bottom of the pan as you whisk.
  • Add chicken stock and bring to a simmer.
  • Salt & pepper to taste.
  • Let simmer for 3-5 minutes, whisking continually.
  • Just before serving, whisk in chilled butter to gloss the sauce.

To serve

  • Slice pork loin into 4 equal pieces, revealing pinwheel pattern.
  • Serve over mashed potatoes, herbed rice or cous cous.
  • Top with 2-3 T of pan sauce.

 This post is reblogged from my earlier site, ‘Inexpensive Eating’

Your Own Shade of Gray: The Latest Trend

Your Own Shade of Gray: The Latest Trend

It seems like Christian isn’t the only member of the Gray family feeling the love right now. Every design trend forecast says that gray tones will be the next big thing coming for the medium-term future. Paint colors, countertops, tile, and even cabinets are turning up in smoky tones.

StarMark finishes, L to R: Macadamia, Pearl, Driftwood, Slate, Peppercorn, Licorice

StarMark finishes, L to R: Macadamia, Pearl, Driftwood, Slate, Peppercorn, Licorice

StarMark Cabinetry has introduced several foggy-toned options, nearly one for every taste. Their Peppercorn tinted varnish option has become one of the more cherished hues of the last several months, with one bathroom project completed and two kitchens on the drawing board.

Cambria Waverton

Cambria Waverton

River White granite

River White granite

Not to be outdone, the countertop options are even more numerous. Quartz composite manufacturers like Cambria, Silestone, and Caesarstone have multiple options that fall into this neutral area. Cambria’s Waverton is even so popular that there is a three-month waiting list as I type this (an unfortunate bit of information for one current client). Of course, the number of granites you can find with gray influences is phenomenal. Supreme White and river White are just 2 of the dozens on the market.

Man-made materials offer even more choices: ceramic tiles, both for flooring and walls can add a dramatic elegance to even small spaces.

Sherwin Williams Gray Pallette

Sherwin Williams Gray Palette

Multiple Gray Tones in Tile

Multiple Gray Tones in Tile

And for those who like the idea but aren’t brave enough to commit for the long-term, paint selections, like the Sherwin Williams collection shown here let you test drive without all the commitment. After all, paint is the easiest material to change in a room.

So don’t get tied up worrying about it – this is one trend that you can lash yourself to.

Join Our E-mail List