
I really like to bake. I’m not good at it, but I like it. I think that part of the trouble is the demanding precision that good baking requires. I’m a kitchen designer by trade – it requires me to be exacting all day long. You would think that those skills would translate into good baking, but it turns out that one of the reasons I love cooking so much is the total lack of precision that’s needed for most dishes (you know, everything else BUT baking).
I just can’t bring myself to weigh all those ingredients or survey the weather conditions before I start. And my hand-eye coordination (to make the finished product look good) is a joke. But still I journey on. Why? Because I love good bread, and the store bought stuff is, let’s just say, less than ‘Wonder’-ful.
So I’ve been on a journey to come up with a good, regular bread recipe that’s still low-maintenance enough for me to pull together. This one isn’t fancy, and you real bakers will probably not be all that impressed, but it works for me. It’s not quite as good as the loaves I can pick up at the bakery, but the cost of ingredients rivals the cost of a loaf of the vacuous, gummy stuff you can pick up off of the grocery store shelf. I like the compromise.
Turns out, the piece that had been missing to this recipe was oat flour. It seems to have added something to the tooth of this bread that was lacking in its absence. I was impressed that swapping out 25% of the flour could have that much impact.
For me, the thing that makes all the difference in the world as to the frequency of my breadmaking was my investment in a KitchenAid stand mixer. I love my stand mixer. I don’t know why I waited so long to get one (yes, I do – it was the price). But the dough hook and the stand mixer do most of the work. The most taxing thing I have to do is count the scoops of flour as they go in (and still I’ve screwed that up on more than one occasion). I use to make bread every couple of months, now I do it about every other week. It’s so easy this way.
Actually, I read that the secret to a good, crusty loaf of French bread requires just a little bit of fussiness at the commencement of baking. And what’s the point of French bread if it isn’t crusty? So I do babysit the dough during the first 10 minutes of it’s baking, brushing it with cold water every 3 minutes. According to what I’ve read, the cold water evaporates off of the surface of the dough and that’s what makes the great crunchy crust on French bread. Sounds like alchemy to me (using something liquid to turn something solid), but it works. It’s a small price to pay for an incredible difference in texture.
Still, I don’t think anyone would confuse this loaf with any artisan bread, but for a baking klutz, it’s a work of art.
Multigrain French Bread
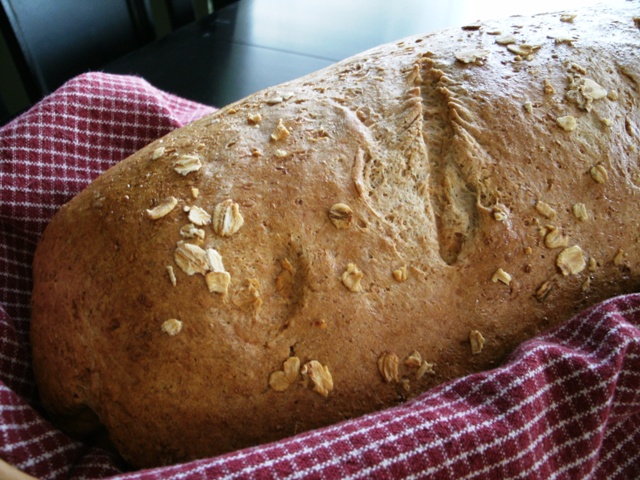
A heartier version of a classic french loaf
- 4 ½ t dry active yeast (2 envelopes)
- 1 T sugar
- 2 C very warm water
- 1 ½ C old fashioned rolled oats (plus 2T for garnish)
- 1 ½ C whole wheat flour
- 1 t kosher salt
- 2 T olive oil (plus extra for greasing)
- 3 C bread flour
- ¼ C Cornmeal (for dusting)
- 1 egg (beaten)
- ¼ C cold water (divided)
- Place yeast, sugar, and warm water into bowl of mixer and bloom for 5 or 10 minutes, until foam head forms.
- While the yeast blooms, place 1 ½ C old fashioned oats into bowl of food processor. Pulse for 10–15 seconds, creating oat flour (it won’t be as finely ground as a regular flour).
- Add dough hook to mixer and turn on low.
- Slowly add oat flour, then whole wheat flour to yeast mixture.
- Add kosher salt, 2 T olive oil.
- Slowly add the bread flour, a little at a time. Once flour is incorporated, increase mixer speed to medium and knead dough until gluten develops and dough is pliable but not sticky (add more bread flour if needed). This should take 10-12 minutes.
- Grease inside of a large bowl with 2 T olive oil.
- Turn dough out and form into ball.
- Place in greased bowl and turn to ensure dough is coated with the oil.
- Cover with tea towel and set in a warm spot to rise until dough doubles in size (45-60 minutes).
- Once dough has risen, turn oven to 425 degrees to preheat while dough has final rise.
- Dust baking sheet with cornmeal and set aside.
- Punch down dough and turn out onto board.
- Divide dough in two and form into desired shape.
- Transfer dough to dusted baking sheet.
- Recover with tea towel and allow to rise a second time for about 30 minutes.
- Just before transferring to oven, mix beaten egg and 1 T of cold water in a small bowl.
- Brush dough all over with egg wash and sprinkle remaining 2 T of rolled oats over the dough.
- Use a sharp knife to cut 3 diagonal slits in top of dough.
- Transfer baking sheet to preheated oven and bake for 3 minutes.
- Open oven door and quickly brush dough all over with cold water.
- Bake 3 more minutes and reapply cold water.
- Bake 3 minutes more and apply cold water for third (and final) time.
- Bake for an additional 35 to 45 minutes, until bread is deep brown and sounds hollow when you tap on it.
- Remove to cooling rack and cool for at least 30 minutes before cutting.