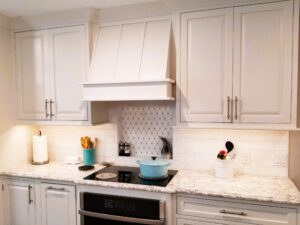
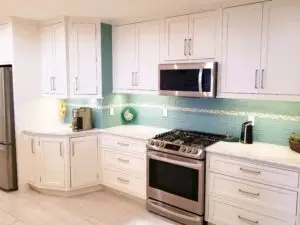
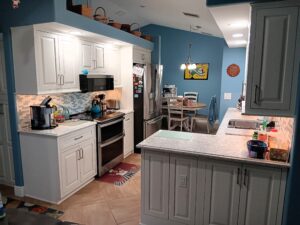
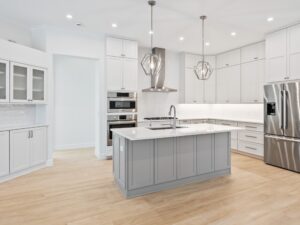
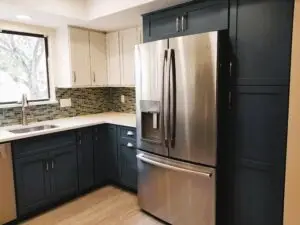
The Kitchen Sink: A Primer

The Kitchen Sink: A Primer

One of the earliest lessons I learned as a designer came when I convinced a client to deviate from her desired kitchen sink idea because I thought it would look better in the space. Big mistake. I still practice what I learned from that rebuke to this day: very few people are ambivalent about the installation style, material or configuration of the kitchen sink that works for them. So here is a quick primer on kitchen sink that might help you if you are feeling unsure about what is important to you.

Mounting Styles

Self-Rimming or Drop-In Sinks

Drop in equal bowl sink in cast iron

A drop in sink is the old-style option. A hole is cut into the countertop material and the sink hangs on counter, concealing the hole. It’s easy to install because the hole doesn’t have to be completely precise nor finished on the edge. The drawback is that the sink lip is usually too high for easy cleaning. Also, it doesn’t look as fashionable. Works best in traditional style settings.

Undermount Sinks

Undermount single bowl sink in cast iron

An undermount sink is just that – a sink that mounts under the countertop, exposing a cut out in the counter top with a finished edge. By far, the most popular style of sink mounting currently, given the popularity of both granite and quartz composite stone counters. It produces a cleaner, more custom look than a self-rimming style but cannot be used with all counter materials. Natural stones, quartz composites (engineered stones), and solid surface materials (like Corian) all work well with undermount sinks. Unlike those materials, an undermount just doesn’t work with laminate counters. Works well with both traditional and contemporary décor.

Farmhouse or Apron Sinks

Farmhouse single bowl sink in cast iron

Under the heading of ‘everything old is new again’. The apron front style harkens back to the days when each piece of kitchen equipment was independent of the others and most people lived on the farm. This is really a stylized undermount sink where the front (or apron) of the sink protrudes from the cabinet face. A very popular style at the moment and belying its name, this treatment works in both elegant and casual settings.

Common Materials

Stainless Steel

Undermount, 60/40 split sink in stainless steel

By far the most popular material for kitchen sinks. They are durable, low maintenance, stain resistant, and heat resistant. They clean up easily, and come in a multitude of mounting styles and configurations. The drawbacks are that they spot easily with hard water and they can scratch. Both are readily correctable.

Two things go into the final quality of a stainless steel sink: the thickness of the steel and the insulation that goes on the backside. Most stainless steel sinks on the market will be between 16 gauge and 22 gauge in thickness. It is counter-intuitive but in stainless steel, the smaller the number, the thicker the steel. You will find most sinks on the market currently come in either 16 or 18 gauge. The insulation does two things: reduces the reverberation of the metal and helps hold in the heat for a tub full of water. As for selections, personally, I’d rather see an 18 gauge sink with good insulation than a 16 gauge sink with poor insulation.

Cast Iron

Farmhouse equal bowl sink in cast iron

Long a popular choice for kitchen sinks, the sinks are manufactured with a top layer of enameled porcelain over the iron. The glossy finish is relatively easy to maintain and is mostly durable. Complaints for cast iron sinks are that they can chip and heavy pots have a tendency to scuff the bottom of the sink. Scuff marks can be buffed out, chips can be patched.

Cast iron sinks can come in a multitude of colors, making them adaptable to almost every design taste. Because of their weight, some mounting styles might require additional support inside the cabinet.

Composite

Drop in equal bowl sink in composite granite

Composite sinks are made up of granite stone dust and resins. This mixtures ensures the material is quite durable, resistant to heat, nonreactive, and long lived. Even so, they can still chip. Available only in matte finishes, the color palette can be limiting for some. And just like cast iron, its weight can require additional support for mounting.

Sink Configurations

Depending on how you prep for dinner, clean up after dinner, and what various auxiliary activities you perform in your kitchen sink will help determine the proper configuration for your lifestyle. The number of bowls in your sink, how multiple bowls are divided, and the depth of these sink bowls are the easiest ways to personalize your sink choice. Here are the most common options.

Single Bowl

Undermount, single bowl sink in stainless steel

One large bowl works well if you pile almost everything into your dishwasher on a regular basis. It also works well if your sink doubles as the dog’s bath. Giving maximum space to the task, the one complaint from clients is that the garbage disposal is not in a separate area, so a quick handwash while scraping dinner dishes might not be the most water-efficient task.

Equal Bowls

Undermount equal bowl sink in stainless steel

I think most of us grew up in a house with this sink configuration. Works well if you do a significant portion of your daily dishes by hand.

Big/Little Bowl

Self rimming 80/20 sink in cast iron

Similar to the previous but with an uneven split between bowls. A big/little bowl configuration gives you more space in the primary work bowl at the sacrifice of the secondary bowl’s size. Generally, the smaller bowl houses the garbage disposal, but there is no rule that requires it. These uneven splits can be found in everything from a 60/40 split, all the way to a 90/10 division, with stops in between.

Triple Bowl

Apron front, triple bowl sink in stainless steel

Not the most common configuration because it requires additional space. Similar to an equal bowl sink, the small third bowl usually sits between the other two and contains the garbage disposal.

Galley

Undermount galley sink in stainless steel

Gaining popularity, a galley sink can be one or two bowls, but the addition of a lip at the top holds various accessories, from a chopping block to a drain board. Originally designed for boats where space is at a premium, the chopping block then doubled as additional workspace, while covering up the sink area.

So which kitchen sink style is right for you? Let us know in the comments below.

Creative Muscle: Shrimp and Mango Ceviche

Creative Muscle: Shrimp and Mango Ceviche

One of the positive things to come out of our current confinement is that creativity in the kitchen has made a resurgence for a lot of people. I have flexed some creative muscles that I have not been accessing for quite some time, this ceviche recipe being one of those creative workouts.

Another Take on Seafood

Ceviche is one of those dishes that I rarely make at home, though I don’t know why because I don’t hesitate to order it at the local Peruvian restaurant. We are all seafood eaters (how many 9 year olds do you know of that adore sushi, grilled octopus, and oysters?), ceviche is a pretty easy dish to whip up, and I like the combination of seafood and fruit, like in my Tex Mex Shrimp Skewers with Peach Salsa. It’s just, for some reason, ceviche doesn’t regularly cross my mind for dinner. I changed that recently.

The hardest part of ceviche is making sure you have fresh seafood, but that requires some some last-minute shopping. One of the things I have found is that IQF shrimp works well in a pinch. (Oh, and if you aren’t up on the lingo, ‘IQF’ stands for ‘Individually Quick Frozen.’) I almost always have it in the freezer, and that allows me to whip this up without much forethought. The rest of the ingredients are fairly standard pantry items in my house, but your mileage may vary.

Tips and Pairings

A couple of tips for you: you want to make sure the vessel in which you marinate your ceviche allows the sauce to completely cover your seafood; and don’t let your ceviche steep for too long – after a while, the citrus juice will begin to break down the seafood. The firmer the fish, the longer you have, but I shoot for 30-60 minutes.

I will normally serve this in a cucumber boat with some black bean salad or even cumin sweet potatoes. Perhaps both. On the chance you are minimizing carbs, I think using it as a salad topper and dressing would be a great idea too.

Why don’t you take some time to flex your culinary creativity? See what you can come up with – and let me know how it turns out.

shrimp and mango ceviche

Shrimp and Mango Ceviche

Scott Duncan, ©2010
A different take on seafood for an light and easy dinner
Prep Time 15 mins
Cook Time 30 mins
Course Entree
Cuisine Seafood
Servings 4

Ingredients
  

  • 1 lb. fresh shrimp peeled, deveined, and halved lengthwise
  • Zest of 1 lime
  • Juice of 4 limes
  • 3 T olive oil
  • 1 jalapeño diced
  • ¼ C fresh cilantro
  • 1 medium mango diced
  • 3 medium shallots sliced thin
  • Salt & pepper to taste
  • 1 seedless cucumber seeded, and cut in half, lengthwise

Instructions
 

  • In the bowl of a food processor or blender, combine lime juice, olive oil, jalapeño, cilantro, salt and pepper.
  • Pulse until combined.
  • In a small, nonreactive bowl, combine shrimp, mango, and shallots.
  • Pour over lime juice mixture, making sure that all shrimp is submerged, and place in refrigerator for 30-60 minutes, stirring occasionally. (Do not let shrimp sit too long in the lime juice – it will begin to break down.)
  • To serve, cut each cucumber half in half, making a total of 4 pieces.
  • Place a cucumber boat on plate, and spoon ceviche into cucumber boats.
  • Garnish with lime zest.
Keyword ceviche, mango, shrimop
Inset Cabinets Comfort

Inset Cabinets Comfort

A 1940’s Bungalow Kitchen Gets a 21st Century Rendition

useful comfort kitchen plans

Recent purchasers of this adorable Spanish mission style bungalow knew what they wanted – a better functioning kitchen that kept with the architecture of this unique house. Built in the 1940’s, the kitchen had received a DIY facelift from a previous owner that did not address any of the issues surrounding twenty-first century living in a WWII era design. Inset cabinets would fit the bill quite easily.

Getting Floored

alder inset cabinetry sink dishwasher

Saltillo tile covers the floors throughout the house, including the kitchen. A desire to incorporate an underused mud room into the kitchen required some shopping luck, combined with clever inlays to eliminate the necessary wall while saving the existing flooring. This resulted in a workspace that is over 50% larger than the original.

That same Saltillo tile became the inspiration for the new room. Drawn to warm wood tones, the clients selected alder as the cabinetry material, finished with just a clear topcoat, allowing the natural appearance of the alder to shine through. Even though white kitchens are classic and popular (like this and this), from a designer’s standpoint, it’s nice to do something different once in awhile.

Back to the Future

alder inset cabinetry with range and mullion glass
alder inset cabinetry with mullion glass

Simplicity was the goal in door style selection. StarMark Cabinetry’s Gillette style, found uniquely in their Inset Cabinets Collection, was the way to go. With a flush door construction, inset cabinetry has a timeless effect that mixes seamlessly into this home’s spirit.

Being the current trend for countertops, quartz composite was the only option that interested the homeowners. Selecting the neutral Cambria Fairbourne finish allows for a variety of color accents that can be swapped out easily as trends change in the future, keeping this renovated kitchen current and architecturally appropriate for years to come.

Incorporation of lazy susan corners, a refrigerator alcove, a pull-out spice rack, display cabinetry, and deep drawers to store pots and pans makes this kitchen the user-friendly space desired by the clients to enhance their daily life.

refrigerator alder inset cabinetry microwave corner

Cabinetry: StarMark Inset Cabinets

Doorstyle: Gillette with flush frames

Wood Specie: Alder

Finish: Natural

Countertops: Cambria Fairbourne

Remodeling Partners: Fred H. Bey Construction, Inc.

Before: Range
Before: Sink & Fridge
Before: Mud Room

Take a video tour of the Before and After

Black Bean Salad: an Easy Side Dish

Black Bean Salad: an Easy Side Dish

Looking for an easy side dish for a quick summer meal? Using easy pantry items allows you to whip up this Black Bean Salad with little preparation or shopping. It won’t take much effort to add it to your dinner tonight.

Looking for dinner ideas too? How about making our TexMex Shrimp Skewers with Peach Salsa or Catfish Tacos with Cucumber Salsa to serve with this dish?

If you want to check out some great storage conveniences for your kitchen, look at StarMark Cabinetry’s internal cabinet accessories.

black bean salad

Black Bean Salad

Scott Duncan, ©2010
A Great and Easy Summer Side Dish
Prep Time 10 mins
Cook Time 0 mins
Course Side Dish
Cuisine Mexican, Vegetarian

Ingredients
  

  • 2 limes juiced
  • 3 T olive oil
  • 1 ½ t cumin
  • 2 garlic cloves minced
  • ¼ C chopped cilantro
  • 1 avocado diced
  • 2 15 oz. cans of black beans drained and rinsed
  • 1 tomato seeded and chopped
  • 1 C frozen corn thawed
  • 1 jalapeño diced
  • 4 scallions chopped
  • Salt & pepper to taste

Instructions
 

  • In a large mixing bowl, combine lime juice, cumin, garlic, salt & pepper.
  • Slowly whisk in olive oil.
  • Stir in cilantro.
  • Toss avocado pieces in dressing to keep from turning brown.
  • Add black beans, tomato, corn, jalapeño, scallions, and gently combine.
  • Check seasonings and adjust as necessary.
  • Refrigerate until ready to serve.
Keyword avocado, black bean, corn
Flowing Gray and White Kitchen

Flowing Gray and White Kitchen

Continuing Kitchen Gridlock

Before: the awkward hallway on the left

Traffic flow is a common reason that clients want to renovate their kitchen, including the owners of this home in Palma Sola Park. Access to the kitchen was cut off from the home’s entryway, either routing through the dining room or the family room to enter the kitchen from anywhere in the house.

Other problems the homeowners wanted solved were permanent seating area in the kitchen, additional storage, an updated look, and more visual interest. At the same time, they wanted to keep with the look of the traditional home.

StarMark Peppercorn island, Dove white perimeter, Cambria Brittanicca countertop
Removing a hallway created a new entry for the kitchen

A Break in Traffic Flow

A solution to several of these problems came by removing the wall separating the kitchen from the entryway and annexing an awkward hallway behind it into the kitchen. This allowed direct access to the kitchen from the family room, dining room, entry, and garage. The extra floor space allowed for an acceptable island with both seating for 4 and additional storage. It also made room for additional pantry storage that did not exist before.

While still not a large space, the new kitchen plan allowed for plenty of balls and whistles requested by the clients. These included lazy susan shelves in the corners; deep drawers to store pots and pans; a pull out for spice storage; dual trash cans. They even gained some display space with glass doors to show off some favorite serving pieces.

The client knew she wanted the island to be a noticed. By selecting StarMark’s Peppercorn, a dark gray accent color, for the island to contrast with the soft white Dove for the perimeter storage was her choice was simple. The stunning Brittanicca quartz counters from Cambria weave together both colors perfectly.

The Winding Road

StarMark Cabinetry Stratford doorstyle in Dove White tinted varnish, Cambria Brittanicca countertop
Flowing Cambria Brittanicca

More importantly, the choice of counters continued the idea of ‘flow’. Brittanicca, a member of Cambria’s Luxury Series, mimics the movement of natural stone while still providing the low maintenance and lifetime warranty that quartz composites afford.

A coordinated marble tile pairs perfectly and also creates a natural focal point in the negative space around the kitchen window. The flowing arabesque shape of the tile is reminiscent of the soft, curvilinear pattern found in the counters. Each gives the other purpose in this elegant and simple room.

Cabinetry: StarMark Cabinetry

Doorstyle: Stratford with custom door profile

Wood Specie: Maple

Finish: Dove White tinted varnish / Peppercorn tinted varnish

Countertops: Cambria Brittanicca

Remodeling Partners:

Fred H. Bey, Inc. (general contractor)

Wade’s Carpet and Interiors

Warming Transformation: A Kitchen Renovation

Warming Transformation: A Kitchen Renovation

After 30+ years, we are fortunate to have a large number of repeat clients. The owners of this home trusted us enough to come back for their THIRD kitchen renovation, and 5th project overall. If I ever enact a frequent shopper program, these people will be first on the list. (I might add that we are talking about a kitchen in three different houses over the span of nearly 20 years.)

Comfortable and Functional

The nice part about working with the same client again is that I already have a good feel for the aesthetic desires of the homeowner. The goals here were warm, traditional, and classic. Functionally, there were a few more things on the list: room for a second oven, a larger island to house the cooktop, a coffee bar area, and a more convenient microwave placement.

Warmth

In three homes, the client has consistently chosen to work with StarMark Cabinetry for their quality, durability, and tasteful selections. The Venice door style is an ornamental choice consisting of a radial doorframe outlined with singles beads and coordinating drawer fronts. Enjoying the natural aspects of wood led my client to the selection Alder, known for its pin knots and mineral streaks that enhance the requested characteristics. The deep brown stain of Hazelnut also hit the coziness quotient the client was looking for.

In terms of appliances, this kitchen has it all: built-in refrigerator, two ovens, induction cooktop, downdraft ventilation, a microwave drawer, and even a separate ice machine to keep up with the expanding number of grandchildren who are frequent weekend guests. The use of a microwave drawer is a great choice when available wall space is inadequate like it is here.

Light

The concern when making darker finish choices is allowing the room to become gloomy. A designer’s trick is to make sure the horizontal surfaces are as light as possible, even when a home has as much natural light as this one does. In a kitchen, those surfaces would be the floors and the countertops. The homeowner worked with our Remodeling Partners at Wade’s Carpet and Interiors to select a large-scale travertine tile to use throughout the first floor living space. This paired nicely with Cambria’s Dovedale quartz composite countertop selection, a near white background interspersed with faint caramel toned veins. Both are subtle but stately.

The neutral simplicity of these anchor surfaces allowed the client to make a bold tile selection for the backsplash. A small scale tile of varying hues was run vertically instead of the usual horizontal application to give the impression of more height than the 8 ft ceiling allowed.

Is It The Last?

The client says that this is the last house, so no more projects. If it is, I’ll be content to know she’s pleased with this outcome. If it’s not, I’ll be happy to work on kitchen number 4.

Cabinetry: StarMark Cabinetry

Doorstyle: Venice

Wood Specie: Alder

Finish: Hazelnut

Countertops: Cambria Dovedale

Remodeling Partners:

     Fred H. Bey, Inc., General Contractor

     Wade’s Carpet and Interiors

Make Holiday Baking Easier

Make Holiday Baking Easier

Great Storage Ideas for the Home Baker

Just like a lot of people, the holidays don’t really kick in for me until the tree is trimmed, presents are wrapped, and the holiday baking commences. A personal favorite are these Chocolate Peppermint Pinwheels or my Quick Bread Cinnamon Rolls. Here are some great accessories to aide you in your baking efforts from StarMark Cabinetry.

Easy Come, Easy Go

That huge stand mixer is a definite necessity for batch after batch of cookies but lugging it from one spot to the other can be a pain. What if you could pull it out and put it back with a simple tug? A stand mixer shelf will allow you to pop the trusty workhorse up to counter height, mix away, and then return it to its home with almost no effort at all.


Spice of Life

The plethora of spices and flavorings you need for baking can be a pain to organize and retrieve. A simple pull out to organize those spices means you never have to dig to the back of the cabinet to find the mace (or the nutmeg, or the ginger…)

Storage and Retrieval

Make sure you not only know where everything is, but easy to get to and use. A variety of accessories can do that for you: chrome basket pull outs are great for mixing bowls and casseroles. Wooden roll out trays are also a painless way to fetch your baking dishes in a snap.


Mixed Meaning

Why not use cutlery inserts to organize all your measuring cups, spoons, graters, and hand beaters? They aren’t just for knives and forks anymore.


Lift Off

Your other appliances need a convenient home as well. Food processors, juicers, bread machines, store neatly away in an appliance garage, and a door that opens vertically means nothing is in the way while you put those appliances through their paces.


Hanging Around

What about those little things that store better when they hang? Not every kitchen has room for a peg board – or does it? In no more space than spices take up, a peg storage pull out will place it all at your fingertips.


It’s the Little Things

Sometimes you don’t want to make multiple trips to the pantry for all your other ingredients. What if you placed a mini-pantry next to your work space? Larger shelves for oils, vinegars, flour, and sugar will always be where you want them.


Spinning Out

Large items and corner spaces. Both can waste valuable storage capacity – unless you combine them. Lazy susan shelves conveniently located in otherwise dead corners maximizes both storage area and ease.


Please Return Your Trays

Stacking muffin tins, cake pans, cooling racks, and cookie sheets are no longer a pain. Each has its own compartment, and everything is organized and easy to grab with tray storage roll outs. Out of all of these, I think this is my favorite!


Watch the video to see some of these in action. And if you want to add these great time savers to your new kitchen, drop us a line. Happy Baking!

Subtle Gray and White Kitchen

Subtle Gray and White Kitchen


Hearing ‘Florida condo’, you generally envision something in either coastal hues or vibrant tones instead of gray, but these clients wanted something subtle and neutral for their recent purchase.


'Before' photoIt’s All Gotta Go

They sold the midwestern homestead, relocated to the sunshine state, and these clients were anxious for something different. The first-floor condo they purchased for their retirement was in desperate need of an update. Sporting the original décor from 40 years ago was cause for this condo to be taken down to the bare bones and a fresh coat of everything put in its place.


Neutral and Simple

The first thing decided on was neutral tones which were anchored by white shaker style kitchen cabinets and a graywash, embossed vinyl plank floor throughout the unit. Being a modest condo, the clients settled on the value-conscious, Stressless Cabinetry line. The Retreat door style and Jasmine White paint created the pillar on which to build our understated palette. Pairing Bianco Sardos granite allowed the clients to best extend their budget and deliver the durability of stone counters that was important to them at the same time. After all, the speckled black, white, and gray markings added a second layer on our growing gray motif.

White Stressless Cabinetry and Bianco Sardos granite


Gray All the Way

A suite of GE appliances in black stainless steel, multi-colored glass backsplash tile, and 2 different tones of paint rounded out our color wheel. Using a multi-tonal backsplash tile helped create the focal point by virtue of the variety of colors found within it. Unfortunately, the first-floor condo required the retention of the existing soffits to hide necessary mechanical attributes. Selecting a darker gray accent sets off the coffered ceiling while giving it some purpose.

White Stressless Cabinetry and Bianco Sardos granite


It Was All Worth It

I believe if you ask the clients about things they would do differently, the only change they would make is to not occupy the space while a full condo renovation was going on. In the end though, they thought it was all worth it. Have a look:


Cabinetry: Stressless Cabinetry

Doorstyle: Retreat

Wood Specie: Maple

Finish: Jasmine White Paint

Countertops: Bianco Sardos granite

Remodeling Partners

Fred H. Bey, Inc. (general contractor)

Wade’s Carpet & Interiors (flooring and backsplash)

Rice’s Appliances

Rust In Your Stainless Steel Sink

Rust In Your Stainless Steel Sink

I had the question again this morning from a client: “Can my stainless steel sink rust?”. While the answer is, technically, ‘Yes, it can,’ the more appropriate answer is, “That’s probably not the problem you have.

Is My Sink Rusting?

The rust you see is most likely NOT from your stainless steel sink but residual rust from another source that is deposited onto your stainless steel sink. It’s like water spots on a drinking glass – impurities left over after water has dried up and not destruction of the glass itself.

The most likely culprit is metal cookware left in the sink to dry. Cast iron pots, some metal baking sheets, or certain types of flatware all have the ability to oxidize in water, and that oxidation is rust. The small amounts of rust then mix with water; the water pools in your sink; the water dries; and POOF! It looks like your sink has rusted.

Unfortunately, the brushed grain of stainless steel makes it an ideal surface to capture these pesky deposits. Luckily, it is easier to explain how to clean it up than it is to explain how it got there in the first place.

Remove the Rust

You probably have all the necessary ingredients to concoct this special, super-secret rust remover right in your kitchen. All you need is baking soda, vinegar, and a sponge. That’s right, the same ingredients used to fashion many a 5th grade science project is all you need to remove those pesky rust deposits from your sink in 5 easy steps:


  1. Pour some baking soda into a bowl. Depending on how much rust you need to remove, you could use anywhere from a tablespoon to ¼ cup or more.

  2. Slowly stir distilled vinegar into the baking soda to create a paste. Remember the lava flow you got in school when you quickly combine equal amounts of these two? You don’t want to do that here. Add just enough to create a paste – somewhere between toothpaste and liquid hand soap is the consistency you want.

  3. Spread the paste on the rust deposit. Let it set anywhere from a minute to 10 minutes, depending on how stubborn the rust is.

  4. Use a sponge to rub the baking soda mixture into the rust deposit. A quick note – notice that the stainless steel sink has a brush stroke grain to it. You want to rub WITH the grain of the steel, not across it. Baking soda does have some abrasiveness to it – rubbing across the grain could create unwanted scratches.

  5. Rinse away baking soda residue with running water.


That should do it. If you have a stubborn rust deposit, you might have to repeat the process a time or two.

It Always Does the Job

In over 25 years of designing and remodeling kitchens, I cannot tell you how many times I’ve had a panicked call from a client insisting that their brand new, stainless steel sink is rusting. Every single time I have received that call to date, this process has done the trick. It’s saved thousands of dollars in unnecessary replacements and countless headaches for homeowners. It should work for your too.

Native Born: Spicy Pumpkin Peanut Soup

Native Born: Spicy Pumpkin Peanut Soup

As far as I’m concerned, one of the unsung culinary combinations in the world is the marriage of pumpkin and peanut butter. (and I probably just lost half of you) Peanut butter spread on toasted pumpkin bread in the morning is a thing of wonder. Something tells me I might lose the rest of you when I try to convince you that this spicy pumpkin and peanut soup is just as good.

This soup has a slightly exotic vibe to it even though it contains items that are in my pantry all the time. I came up with this recipe several years ago when I was playing around with a menu that contained ingredients indigenous to the Americas for the whole meal. (What? It’s a hobby.) Pumpkin, peanuts, peppers, allspice – all native to North and South America and were unknown to Eurasians before Columbus’ voyage. (OK, they aren’t 100% sure about peanuts but they think so.) In case you’re curious, the rest of the meal revolved around turkey, potatoes, tomatoes, quinoa, chocolate, vanilla, and cranberries. Almost sounds like a traditional American Thanksgiving, doesn’t it?

The Spouse has always talked about an African squash and peanut soup that he experienced somewhere in his past. I’ve had curried pumpkin soup on numerous occasions. Obviously, this concept isn’t completely new and different. This is just my take on the idea. It comes together quite easily and is a hearty option if you live somewhere that gets cool in the evening. (We just crank the a/c down a little farther instead.)

Cooking with jalapeños is always tricky for me because the heat is never consistent. On one occasion, removing the seeds is required to keep the heat from blowing one’s head off. At another time, the addition of the seeds still doesn’t make it hot enough. I’ve always been told to taste each pepper to forecast its heat – they all taste hot to me like that. Most of the time I just give up and use crushed red pepper flakes because of the Scoville consistency. If I do that in this dish, I find I miss the fruity back notes only derived from fresh peppers, but too much heat drowns out the delicate pumpkin flavor. I can never win. The choice is yours.

One note of caution: because this is such a thick combination, the mixture can scorch on the flame if you aren’t careful. A moderate flame and the occasional stir should keep that from happening to you. A bonus to that is that the soup will hold its temperature quite well in a covered pot.

So if you’re feeling a little adventurous but don’t want to invest in unusual ingredients, this is the perfect dish for you to try – it’s distinctly American.

The recipe

Spicy Pumpkin Peanut Soup

Scott Duncan, ©2018
Hearty and delicious with an exotic twist. Feeling a little adventurous but don’t want to invest in unusual ingredients? Give this soup a try.
Prep Time 10 mins
Cook Time 40 mins
Total Time 50 mins
Course Soup
Cuisine American

Ingredients
  

  • 3 T olive oil
  • 1 medium onion chopped
  • 1 medium jalapeño seeded and chopped
  • 1 medium celery stalk chopped
  • 1 t ground allspice
  • 2 C pumpkin puree or 15oz can
  • 1 bay leaf
  • 1 qt chicken stock
  • 2/3 C peanut butter
  • 2 T cider vinegar
  • Salt & pepper to taste
  • 4 T sour cream optional garnish
  • 2 scallions thinly sliced (optional garnish)
  • 4 t chopped peanuts optional garnish

Instructions
 

  • Preheat soup pot over medium high heat.
  • Add chopped onion, jalapeno, celery, allspice, salt and pepper.
  • Sauté until vegetables are soft, about 5-7 minutes.
  • Add pumpkin puree, stir to combine, and sauté an additional 2 minutes.
  • Stir in bay leaf, chicken stock, and peanut butter.
  • Adjust seasoning.
  • Simmer for 30-40 minutes, stirring often.
  • Just before finishing, add cider vinegar and stir to combine.
  • Remove from heat.
  • Salt and pepper to taste.
  • Working in batches, move soup to blender and blend until smooth. (Alternatively, you can also use an immersion blender in the soup pot.)
  • Ladle into serving bowls and top with sour cream, scallions, and chopped peanuts, if desired.


Orange You Glad It’s a Holiday? Orange Mustard Glazed Ham

Orange You Glad It’s a Holiday? Orange Mustard Glazed Ham

Who doesn’t love a holiday? All the family. All the friends. And the food is good too. This one won’t win any awards for creativity or originality, but it totally scores where it counts – it tastes great, feeds a crowd, and is pretty easy to pull off. And besides, other than my picky nieces, who doesn’t love a good ham?

This is a recipe I came up with one year when money was a little tight and I still had to feed 10 or 12 people for Christmas. Picking up a ham anytime is a relatively inexpensive option to feed a lot of people, but at the holidays they can be a steal. As I write this in 2018, I’m planning on making this dish for Easter dinner, and I was able to score a spiral-slice ham for 95 cents per pound. Makes it a pretty sweet deal. Add another 3 bucks in glaze ingredients, and it’s a downright bargain.

I have found that some of the less expensive ham options can be more salty than others. If this is true for yours, you can always boil the ham first. Stick it in a huge pot, cover with cold water, bring it up to a boil, reduce it to a simmer, let it boil for 20 or 30 minutes, then turn off the heat, let the ham sit in the water for an hour or two, pull it out, pat it dry, and proceed with this recipe.

Of course, this recipe is all about the glaze. And when you get down to it, isn’t ANY ham recipe all about the glaze? A couple of tips for you: 1) make sure you use FRESH-SQUEEZED orange juice. I’ve tried it with the ready-to-drink stuff out of the refrigerator case, and you can tell. I’ve also tried using orange marmalade instead, and again, just not the fresh taste you get out of squeezing the oranges yourself.

Beyond that, this is a pretty simple recipe. The only other piece of advice I can give is to make sure you don’t overcook the glaze. Because of the sugar content, it can go from ‘done’ to ‘burnt’ fairly quickly, especially if your oven is too hot.

So ham it up for your next holiday meal. You’ll be glad you did.

Orange Mustard Glazed Ham

Scott Duncan, ©2018
An easy-to-make entree is one key to a stress-free holiday. This ham recipe tastes great, feeds a crowd, and is pretty easy to pull of. A real holiday winner.
Prep Time 10 mins
Cook Time 2 hrs 30 mins
Total Time 2 hrs 40 mins
Course Entree
Cuisine American

Ingredients
  

  • Zest of 1 orange
  • 1 C fresh squeezed orange juice
  • 1 C brown sugar packed
  • 1 t ground cloves
  • ¼ t ground black pepper
  • 2 t chopped fresh thyme
  • ¼ C Dijon mustard
  • 10 lb smoked ham

Instructions
 

  • In a medium saucepan over medium heat, add orange zest, orange juice, brown sugar, ground cloves, black pepper, fresh thyme, and Dijon mustard.
  • Stir to combine.
  • Cook over medium heat until mixture is reduced by half, stirring occasionally.
  • Set aside.
  • Preheat oven to 325°.
  • Rinse ham thoroughly and pat dry.
  • Slice through ham skin & fat cap ¾”, creating a diamond pattern.
  • Place ham on a wire rack, cut side down.
  • Set wire rack in roasting pan and roast on lower rack of oven for about 2 hours (figure about 10 minutes per pound of ham).
  • Remove roasting rack from oven. Liberally brush ham with orange Dijon glaze mixture.
  • Return roasting pan with glazed ham to oven.
  • Roast an additional 20-30 minutes.
  • Remove from oven.
  • Let rest for 30 minutes before carving.
Dressed for the Holidays: Sage and Celery Stuffing

Dressed for the Holidays: Sage and Celery Stuffing

Stuffing or dressing? Which do you prefer? I’m strictly a dressing guy myself. Either way you choose, this one has been my go-to recipe forever. It’s a riff on my mother’s and grandmother’s traditional Thanksgiving stuffing, and (if I do say so myself) it’s pretty darned good. Make no mistake, this is not diet food. THIS is extravagant comfort food, but that’s what the holidays are for, aren’t they? I’ve morphed this over the years from my grandmother’s original concept to make it my own.

This Is an herbaceous, earthy accompaniment to just about any holiday entrée. Of course, the traditional Thanksgiving turkey is the most common in our house. But I’ve paired this dressing with a ham, roast pork, lamb, and beef over the years. Haven’t been disappointed yet.

And it’s a great jumping off point to make the dish your own. On more than one occasion, I’ve added sausage, apples, dried fruit, or cooked grains as augments to the dressing. When I was a kid, Mom would add canned oysters. I can promise you, you will never find canned oysters in this dish at my house – not even on a dare.

The biggest piece of advice I can give you on this recipe: don’t skimp on the bread. When I was a kid, my grandmother made this with mass-produced sandwich bread. That just doesn’t work. This needs to be a hearty, crusty, chewy loaf of bread. I grab a couple of loaves from the mega-mart bakery department, what they label as an ‘artisan loaf’.  Makes all the difference in the world. Trust me.

The other piece of advice: don’t try to make this a calorie-friendly recipe. Just don’t. If you want calorie-friendly, either make something else or have a very small portion. It’s the holidays, butter is supposed to be your friend.

If you take those two bits of wisdom, the rest is pretty easy. Normally, I buy the bread a few days ahead, cube it, then lay the bread cubes out overnight to dry completely. Once dried, I store them in a zipper bag on the pantry shelf until I’m ready to assemble. Assembly is easily done the night before – just make sure you have room in the fridge. You know how the prep for those huge holiday meals can eat up the space.

Another tip: roast turkeys need to rest after cooking for quite awhile. Like, up to an hour. So once the turkey comes out, all the sides, including this dressing, go into the oven. Makes life so much easier… and leaves time for a glass of wine in the meantime. So have a happy holiday and I hope you enjoy this one as much as generations of my family have over the years.

Sage and Celery Stuffing

Scott Duncan, ©2017
This is the one I get asked about all the time. An herbaceous, earthy addition to any holiday meal.
Prep Time 1 hr 40 mins
Cook Time 1 hr
Total Time 2 hrs 40 mins
Course Side Dish
Cuisine Holiday
Servings 8 -12

Ingredients
  

  • 2 loaves of hearty bread approx.. 1 lb. each, cut into 1” cubes
  • 2 sticks 1 C + 2T unsalted butter, divided
  • 2 bay leaves
  • 2 large onions cut into ½” dice
  • 1 head of celery cut into ½” dice
  • ¼ C chiffonade of fresh sage
  • 2 t kosher salt
  • 1 t ground black pepper
  • 4 C chicken stock
  • 3 eggs lightly beaten

Instructions
 

  • Preheat oven to 250° F.
  • Place bread cubes on two baking sheets in a single layer.
  • Bake for 1 hour or until bread is dried out but not browned.
  • Set aside.
  • In a large skillet over medium heat, add 1 C unsalted butter, bay leaves, onions, celery, sage, salt, and pepper.
  • Sauté until vegetables are translucent, approximately 10-12 minutes.
  • Set aside to cool for 5 minutes.
  • Preheat oven to 400° F.
  • In a very large mixing bowl, combine dried bread cubes, sautéed vegetable mixture, and chicken stock.
  • Mix to combine.
  • Let sit for 10 minutes and mix again.
  • Let sit a second time if necessary until almost all of the chicken stock is absorbed.
  • Add lightly beaten eggs and mix until thoroughly combined.
  • Prepare a 13x9 inch baking pan with the remaining 2T of butter.
  • Pour stuffing mixture into prepared baking pan.
  • Place baking pan on a sheet tray and bake for approximately 1 hour, until stuffing is golden brown and firm to the touch.
  • Let stand for 10 minutes before eating.

Notes

You can make this the night before, store it in the fridge, and then bake it off while the roasted turkey rests.
I also lay the cut bread cubes on a sheet tray overnight to dry out instead of drying them in a low oven.


Bungalow on a Budget

Bungalow on a Budget

Bungalow on a Budget 2A recently widowed client’s decision to simplify her life included moving into a smaller home. Like any new home, there were many projects to be completed. Hers included updating the kitchen she inherited upon moving in. As with many clients, her budget was limited.

There were a few caveats from the beginning: 1) the existing beige floor tile running throughout the house and had to be maintained; 2) she needed storage space in the small kitchen; 3) she wanted warmth.

First off, working around the existing tile meant that no major changes to layout or walls could be made (a plus for the budget, a negative for storage), so we set about maximizing accessible storage for the client. Deep drawers occupy the majority of the under-counter storage, with a couple of roll out trays next to the fridge for flexibility. Upper cabinets with adjustable shelves round out the storage capacity.

An extended conversation was had over the placement of a microwave: convenience of use vs. maximizing storage. Storage won out. That decision meant the microwave was combined with the hood and placed above the cooktop. The addition of a pull out for trash, and ample tray/bakeware storage establishes a place for everything while still be conveniently accessed. Choosing Crew Collection’s Maple Stratford doorstyle in Butterscotch stain ensured her budget would stretch as far as possible while still maintaining the hospitable style she desired.Bungalow on a Budget 4

While engineered quartz countertops are all the rage now, they are not always the most budget-friendly of options. One way to get the most value out of your countertop budget while keeping with stone is to consider granite. Engineered quartz pricing options seem to bunch in the upper-middle category, leaving very few economical choices. Natural stones like granite can more readily be found at competitive prices that maximize the value a client can receive. This homeowner chose to go that route, selecting a Santa Cecilia granite in earthy, brown tones, black accents, with flecks of garnet.

White appliances brighten things up while lending a casual softness to the narrow kitchen. A slide-in range was necessary here, opening up the short run of counter space. By removing the appliance splash and relocating the controls to the front edge of the cooktop, unnecessary visual bulk gave way to uninterrupted wall tile. This effect makes the cooking niche look as large as possible. Eclipse Linear tile was the homeowner’s choice here. The mixed media tile comes in a variety of colors, with the Tranquility finish being used here. The subtly greyed blue and green glass tiles found in the backsplash are mixed with a tumbled stone punctuate the informality desired by the new homeowner.

The term ‘budget friendly’ is always relative, but this homeowner’s new kitchen fit the bill perfectly.

Bungalow on a Budget 3

Cabinetry: Crew Collection

Doorstyle: Stratford

Wood Specie: Maple

Finish: Butterscotch

Countertops: Santa Cecilia granite

Remodeling Partners: Tradewinds Tile & Stone

And get a look at the ‘Before’

Bungalow Before 4 Bungalow Before 3 Bungalow Before 2 Bungalow Before 1

Classic Kitchen in Braden Woods

Classic Kitchen in Braden Woods

After many years in their home, this Braden Woods couple had updated everything except the kitchen. We helped them rectify that. Over the years, warm wood tones had permeated the rest of the décor so it only made sense to carry that same feel into the rejuvenated kitchen area.

The layout of the old kitchen made it seem small and confined. By simply removing the peninsula barrier, we were able to create more visual space and bring much needed natural lighting into the dining area. Raising the drop ceiling allowed for additional storage and magnified the formerly tight space even more. Desiring a focal point when looking in from the living area, the small wine rack doubles as both decoration and convenient storage.

Selecting a raised panel cabinet in warm wood continued the classic comfort the homeowners had achieved with previous updates. StarMark Cabinetry’s Alder Hanover doorstyle in Toffee stain was the only real contender in the homeowners’ eyes. Topped with Zanzibar granite, the subtle ruby-chocolate tones in both stone and wood were allowed highlight one another. A simple 1×4 tri-toned ceramic tile splash reemphasized that chocolaty theme and gave the room a slight oomph. Timeless, stainless steel appliances from Samsung completed the subtle yet stylish look the homeowners were after. Now the kitchen is as current and comfortable as the rest of their home.

Cabinetry: StarMark Cabinetry
Doorstyle: Alder Hanover
Wood Specie: Alder
Finish: Toffee stain
Countertops: Zanzibar granite
Remodeling Partners: Cusano Construction Co.


A New Member of the Crew: Crew Cabinetry Joins Our Line-Up

A New Member of the Crew: Crew Cabinetry Joins Our Line-Up

Cherry Shaker Cabinetry

Come by and meet the newest member of the Duncan’s Creative Kitchens team: Crew Cabinetry. Crew Cabinetry is what everyone wants – high quality construction, dependability, and consistency at a competitive price. Crew isn’t a stripped down cabinet box. Crew retains all the good looks and quality warrantied construction of custom cabinetry in a collection of popular doors and finishes. These are the looks homeowners want for their new homes, along with soft close doors and drawers as standard, at a price point that offers unbeatable value.

Nine doorstyles are available in oak, maple, and cherry – everything from a sleek, contemporary slab doorstyle to raised panel traditional. The ever-popular transitional shaker style actually has 5 different options, one to satisfy any design aesthetic.

Crew Doorstyle Options


Stain options cover all the popular traditional looks: Natural is a clear coat that allows the beauty of the hardwood to shine through. The honeyed warmth of Butterscotch is going to be a crowd pleaser. Paprika will add a bit of spicy kick to your palette, while Hazelnut lends a stoic heft to any design.

Crew Stain Palette

Crew also offers three of the most popular painted finishes around: traditional White, neutral Marshmallow Cream, and the trendy favorite, Peppercorn, for that charcoal vibe everyone is currently raving about.

Crew Paint PaletteLest you think Crew is all flash and no substance, it’s all-wood construction, dovetailed drawer boxes, soft close hinges, and lifetime warranty will quickly put your mind at ease. You don’t find lifetime warranties at this price-point very often. Why? Because most manufacturers don’t build cabinets to last in this budget range. Crew does. Lifetime Warranty, even on the finish. You just can’t beat it.

Crew Cabinetry Specs

Kitchens, baths, laundry rooms, entertainment centers, home offices. No matter the room, Crew is the one for you. Swing by the showroom or give us a call to set up a consultation in your home. This Crew is ready.

White Shaker Cabinetry

Countertop Vision: Cambria Let’s You See Your Future Today

Countertop Vision: Cambria Let’s You See Your Future Today

Cambria, the quartz composite countertop manufacturer has just released two new tools to help homeowners envision their future: DragonVision and Cambria AR.

DragonVision is accessible from the Cambria website on any device and can help homeowners discover the style that is right for them. Start by selecting from the pre-designed kitchen layout that best represents your taste. From there you can change out countertop finishes, edge treatments, wall colors, and cabinet tones. It won’t give you an exact view of your kitchen, but it is a great tool to help guide a homeowner in selecting a style that suits him or her. This typs of room mock-up software has been around for awhile, but it is nice to have brand-specific finishes that you can plug in. With the advances in pattern technology over the last few years, the ability to see what a full section of Oakmoor or Brittanicca will look like can be a huge help to clients trying to make aesthetic decisions. You can launch DragonVision here.

If DragonVision is a little too mundane for you, Cambria has also gone one step further: Cambria AR. Cambria AR is an iOS fueled app available at the Apple app store. This one is much cooler and has caused me to wish for something other than my Android phone for the first time. Cambria AR allows you to scan your existing kitchen countertops, plot out the edges, and then plug realistic Cambria finishes into your existing kitchen. Pretty cool. Since it is apple-based, I haven’t been able to play with it myself, but the concept is intriguing. Watch the video about Cambria AR and download the app here.


Both of these are worthwhile tools for any homeowner who is struggling to select countertop finishes. I plan on using them myself with clients.

Wing and a Prayer: Lemon Ginger Wings

Wing and a Prayer: Lemon Ginger Wings

It’s fall and that means it is tailgating time again! It’s not that I’m an enthusiastic football fan, but anytime food is involved, sports are better. Whether it’s Friday nights at the high school, Saturday afternoon college games, or hovering at the TV on Sunday afternoons for the pro teams, you gotta have the right eats to make it all better.

I actually played with this recipe over the summer, and Don has been harping at me to get it up on the site ever since (he really just wants me to make it again). He’s a hot wings freak. I’m not a big fan of the hot sauce based kind, but I enjoy these because they have a more complex flavor.

I also roasted these wings instead of deep frying them. I’m certainly not averse to deep fried goodness; I’m just too lazy to clean up the mess when it’s over. Besides, I can lie to myself and call them healthy this way.

It’s a simple marinade – both in ingredients and assembly. There’s something about the combination of lemon and ginger that I love. I didn’t want an overt Asian bent to the flavor, but you could also switch out the salt for soy sauce and add a little toasted sesame oil to get yourself there.

And it’s a total do-ahead too. I mixed it up the night before and made them for lunch on a weekend. The best part is that the reduced marinade makes a phenomenal glaze on the roasted wings – a frugal bonus.

This will also translate very well to other chicken pieces if you don’t want to make wings. And have you noticed how expensive chicken wings are? They are just as expensive as boneless chicken breasts at the local mega-store! Once in a blue moon they’ll go on sale for about 99 cents per pound, which is the only time I buy them. I just can’t bring myself to pay almost three bucks a pound for what used to be throw-away parts (damn the rising popularity of Buffalo wings).

If you’re going to use other chicken parts, I’d recommend using the skin-on variety. You need that crunch factor you get from the roasted skin – my test of skinless chicken breasts felt like it was missing something. Besides, you aren’t deep-frying, so you need something to keep the chicken moist. I didn’t try these on the grill, but I think they’d do just fine. If you do decide to grill them, let me know how they turn out.

So whether you’re a true-blue tailgater, a weekend fanatic, or a once-in-awhile enthusiast, add these wings, and you should be all set.


Lemon Ginger Wings

Scott Duncan, ©2017
Easy wings for your next tailgate party
Prep Time 2 hrs 10 mins
Cook Time 30 mins
Total Time 2 hrs 40 mins
Course Entree
Cuisine Asian

Ingredients
  

  • 2 lemons zested and juiced
  • 2 cloves of garlic grated
  • 1 T grated fresh ginger
  • ½ t ground red pepper
  • 2 t salt
  • 1 t ground black pepper
  • ½ C honey
  • 2-3 lbs. chicken wings

Instructions
 

  • Cut each chicken wing into 3 pieces: the drummette, the flat, and the tip. Discard the tips (or save them for stock).
  • Place the drummettes and flats into a gallon-size, resealable plastic bag.
  • In a mixing bowl, combine lemon zest, lemon juice, garlic, ginger, ground red pepper, salt, black pepper, and honey.
  • Whisk to combine.
  • Pour over chicken wings and ensure the marinade is thoroughly distributed.
  • Seal the plastic bag, and place chicken into refrigerator for at least two hours (and up to overnight).
  • Preheat oven to 425 degrees.
  • Line a lipped sheet tray with heavy-duty foil.
  • Spray foil with nonstick cooking spray.
  • Lightly shake off excess marinade and place chicken parts in a single layer on foil-lined baking sheet.
  • Pour the remaining marinade into a small saucepan.
  • Roast chicken wings for 15 minutes.
  • As the chicken wings roast, reduce marinade in saucepan over medium heat.
  • Let marinade reduce by ¾, until it become a thick glaze.
  • Remove from heat when it reaches desired consistency.
  • After 15 minutes, turn wings over and return to oven for 10 minutes.
  • At the end of the 10 minutes, brush wings with glaze and roast for 5 more minutes. (This will make a total cooking time of 30 minutes.)
  • Serve with plenty of napkins.

 This post is reblogged from my earlier blog, “Inexpensive Eating”.

Breaking Down Kitchen Barriers

Breaking Down Kitchen Barriers


Having clients refer us to their friends is complimentary. Having clients use us a second time is humbling. While shifting into retirement, these repeat clients moved into a new Garden Lakes condo to begin the next phase of their lives. There was one problem: the kitchen was nothing like they were used to; closed off, dated, and not inviting at all. What was the solution? Eliminate the walls and merge the kitchen with the rest of the living area to create optimal space for these homeowners.

The condo had a wonderfully large footprint that was not being utilized to optimum efficiency. Existing wood floors ran through most of the public areas of the condo and the clients wanted those to remain. Partitions separating the kitchen from both the dining area and living room had to go. In their place stood a moderate island that doubles as a breakfast space, and lots of negative space. This is a situation where less was certainly more.

Knowing they were using modern accessories, the homeowners chose a modified shaker doorstyle painted in a soft white varnish. Topped with the watery blues subtly found in the quartz composite countertop, these transitional elements balance the stark modernity of the homeowner’s existing collection.

The blues found in the countertop were the inspiration for the paint selection. The homeowners then added a bit of sparkle with an understated but contemporary glass tile backsplash. The existing wood floors adds to the transitional warmth of the clients’ new home.

Cabinetry: StarMark Cabinetry

Doorstyle: Stratford

Wood Specie: Maple

Finish: Dove Tinted Varnish

Countertops: Cambria Montgomery


Thank Goodness for the Farmer’s Market: Zesty Zucchini Cakes

Thank Goodness for the Farmer’s Market: Zesty Zucchini Cakes

Late summer always means one thing: an abundance of everything you grow in the garden… or so I’ve been told. I wouldn’t know firsthand because I can’t grow dirt. I’ve tried many times over the years, but it’s no use. To give you an example: a friend who is also a Florida Master Gardener took pity and offered to help. She came over and planted an assortment of indigenous plants that she said we couldn’t kill. Challenge accepted – they lasted 3 months. Luckily, the farm stands have an abundance as well. Right now, it’s zucchini as far as the eye can see – and I have no problem letting someone else do the gardening.

I’ve been making these zucchini cakes for a while and they couldn’t be easier to throw together. In about 15 minutes of prep time, you can be well on your way to a great side dish, salad topper, or meat-free entrée. I’m old-fashioned and use a box grater, but the grating blade of a food processor would speed things up for the technologically inclined (I just don’t like to wash it all).

The best secret I can impart is this: drain as much liquid as you can from the grated zucchini. No lie, it is make or break for this recipe. Too much water and the things just fall apart. I usually just wring the dishtowel full of vegetables and squeeze until I’m blue in the face, but you can do whatever works best for you. If time isn’t a factor, you can toss the grated zucchini with the salt, drop it in a colander, weight it down, and let the liquid drain into a bowl for a few hours. Using the dishtowel method turns this into a weeknight dish.

Of course, you can change up the flavor ingredients as you desire. I’ve gone the traditional Italian route, but zucchini tend to take on the flavor of whatever you add to them (kind of like mushrooms). And since the 6-year old has decided she likes spicy food, I’ve been allowed to amp up the heat. If that isn’t your thing, then feel free to back off the red pepper flakes (or eliminate it completely).

And for fried foods they aren’t too bad, as far as calories go. According to my unofficial calculations, they end up about 100 calories apiece. I’ve been on a healthier kick as of late (ever since I realized I couldn’t button my pants), so this dish has made an appearance on our table whenever I’m really craving fried foods.

Let me know what you think – and if you consider yourself a gardening guru, I’m happy to be your greatest challenge.

Zesty Zucchini Cakes

Scott Duncan, ©2017
Take advantage of the abundance of the garden with these satisfying zucchini cakes. A great side dish or a light, meat-free entree.
Prep Time 15 mins
Cook Time 20 mins
Total Time 35 mins
Course Entree, Side Dish
Servings 9 -10 cakes

Ingredients
  

  • 1 ½ - 2 lbs. fresh zucchini 3 medium zucchini
  • 3 scallions chopped
  • 2 cloves garlic finely minced
  • 3 T chopped parsley
  • 1 t fresh thyme
  • 1 t dried oregano
  • ½ t kosher salt
  • ½ t ground black pepper
  • ¼ t red pepper flakes
  • 2 eggs lightly beaten
  • ½ C panko bread crumbs
  • 4 T grated parmesan cheese
  • ¼ C vegetable oil divided
  • Sour cream for garnish if desired

Instructions
 

  • Grate zucchini either on a box grater (using the largest holes) or with the grating blade of a food processor.
  • Place grated zucchini in a clean kitchen towel, squeeze out all excess moisture, and discard liquid.
  • Place drained zucchini in a large mixing bowl.
  • Add scallions, garlic, herbs, salt, black pepper, red pepper flakes, and mix to combine.
  • Add eggs, panko bread crumbs, and parmesan cheese.
  • Mix until well combined.
  • Preheat a 10” nonstick sauté pan over medium heat with 2T of vegetable oil.
  • Working in batches, portion 1/3 C of zucchini mixture into a patty and add to heated sauté pan.
  • Cook until first side is nicely browned, approximately 7-8 minutes.
  • Flip. Continue cooking until second is browned. It should take an additional 5-6 minutes.
  • Remove from pan and place on a baking sheet, lined with paper towel for draining.
  • Add 2 more tablespoons of vegetable oil to sauté pan and cook the remaining zucchini cakes in the same manner.
  • (You can place the finished zucchini cakes into a 200° F oven while you continue cooking additional batches).
  • To serve, to with a dollop of sour cream and additional chopped scallions, if desired.


Join Our E-mail List